

Kent NGfL Robolab Project
2000 - 2001
The Fly
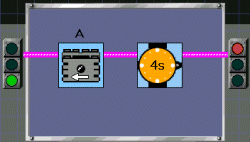
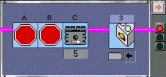
The fly is built in four stages, with a program for each stage, ranging from extremely simple to very complex. The main body of the fly remains the same at each stage, but the head gets progressively more interesting. The only major criticisms with the fly are that you have to remove the head for programming, as it is attached across the infra-red receiver, and the head itself is prone to fall off if the fly isn't handled carefully when being picked up or stored. Programming at stage one is at Pilot Level 1 and involves attaching the wires from both motors to port A and running them for 4 seconds. We missed out this stage completely and also stage two.
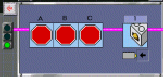
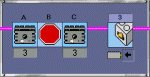
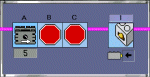
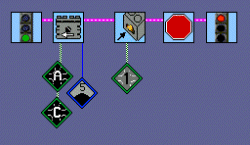
Stage two was at Pilot Level 4 with a program of four steps, as shown below. The model differed only slightly from stage one in that the wires from the two motors were now attached to individual ports ( A and C), and two touch sensors were attached to ports 1 and 3. The sensors were designed to be held, one in each hand, so that the fly could be controlled like a simple remote control toy.
At stage three, the head is rebuilt to
incorporate a touch sensor behind the new proboscis. When
the fly hits an obstacle, the proboscis is pushed in to
hit the touch sensor, which  stops
the motors. A program is provided in Inventor Level 3 for
the children to use and to discuss. I felt that this was
an acceptable program for my children to use, as they had
already had some experience with the Inventor Level. However,
if this were to be a child's first experience of Inventor
Level, perhaps it is slightly too advanced, especially for
younger juniors, as there are a number of modifiers attached.
I would recommend using the model at each stage to this
point for new-comers to Robolab, but would advise giving
some input first to familiarise the children with the new
features of Inventor Level. They would need some practice
in creating very simple programs and stringing icons together
before using this program.
stops
the motors. A program is provided in Inventor Level 3 for
the children to use and to discuss. I felt that this was
an acceptable program for my children to use, as they had
already had some experience with the Inventor Level. However,
if this were to be a child's first experience of Inventor
Level, perhaps it is slightly too advanced, especially for
younger juniors, as there are a number of modifiers attached.
I would recommend using the model at each stage to this
point for new-comers to Robolab, but would advise giving
some input first to familiarise the children with the new
features of Inventor Level. They would need some practice
in creating very simple programs and stringing icons together
before using this program.
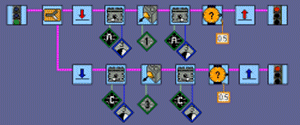
Stage four means another rebuild for the head, this time to incorporate two touch sensors and pincers which work to change the fly's direction when one of the pincers activates one of the sensors. As you can see from the program below, it is very complex for inexperienced users and the level of difficulty between the four stages increases unbelievably quickly! New modifiers are introduced as well as a branching program, where two programs run simultaneously. My year fours coped extremely well with this model at each stage, discussing the programs and making alterations quite confidently. The movement of the fly's legs impressed the children enormously.
Verdict - a super model, designed to impress, but altering the given program could be daunting for new users, as wires have to be removed and restrung. On the whole, changes which were made were not strictly necessary, but occurred because the children wanted to try out their own ideas. I felt that this was a positive point. The children could write their own programs for the fly if they already have some Inventor Level experience. They would enjoy this activity more than altering the templates in the Pilot Levels, as well as learn a lot more. The given Inventor Level programs for this model were not too difficult to "read" and formed the basis of valuable discussion about the use of two programs running simultaneously, as well as the use of modifiers and "jump and land" (repeat) sequences.
If you are a regular visitor to my site and find the free resources useful, please consider making a donation. All proceeds go towards hosting fees and keeping this not-for-profit website ad free.
Copyright © 2002 to 2011 Diane Hawkins All rights Reserved.
Subscription services are not allowed to link to this site.
Graphics from Printmaster Gold UK Publishing Suite version 7 "The images used herein were obtained from Mindscape's PrintMaster product, (c) 1998 Mindscape, Inc., 88 Rowland Way, Novato, CA 94945 USA. All rights reserved."
~ Site Design by Diane Hawkins ~